
[Train] tab provides a function to train the parameters required for training according to the set parameters.
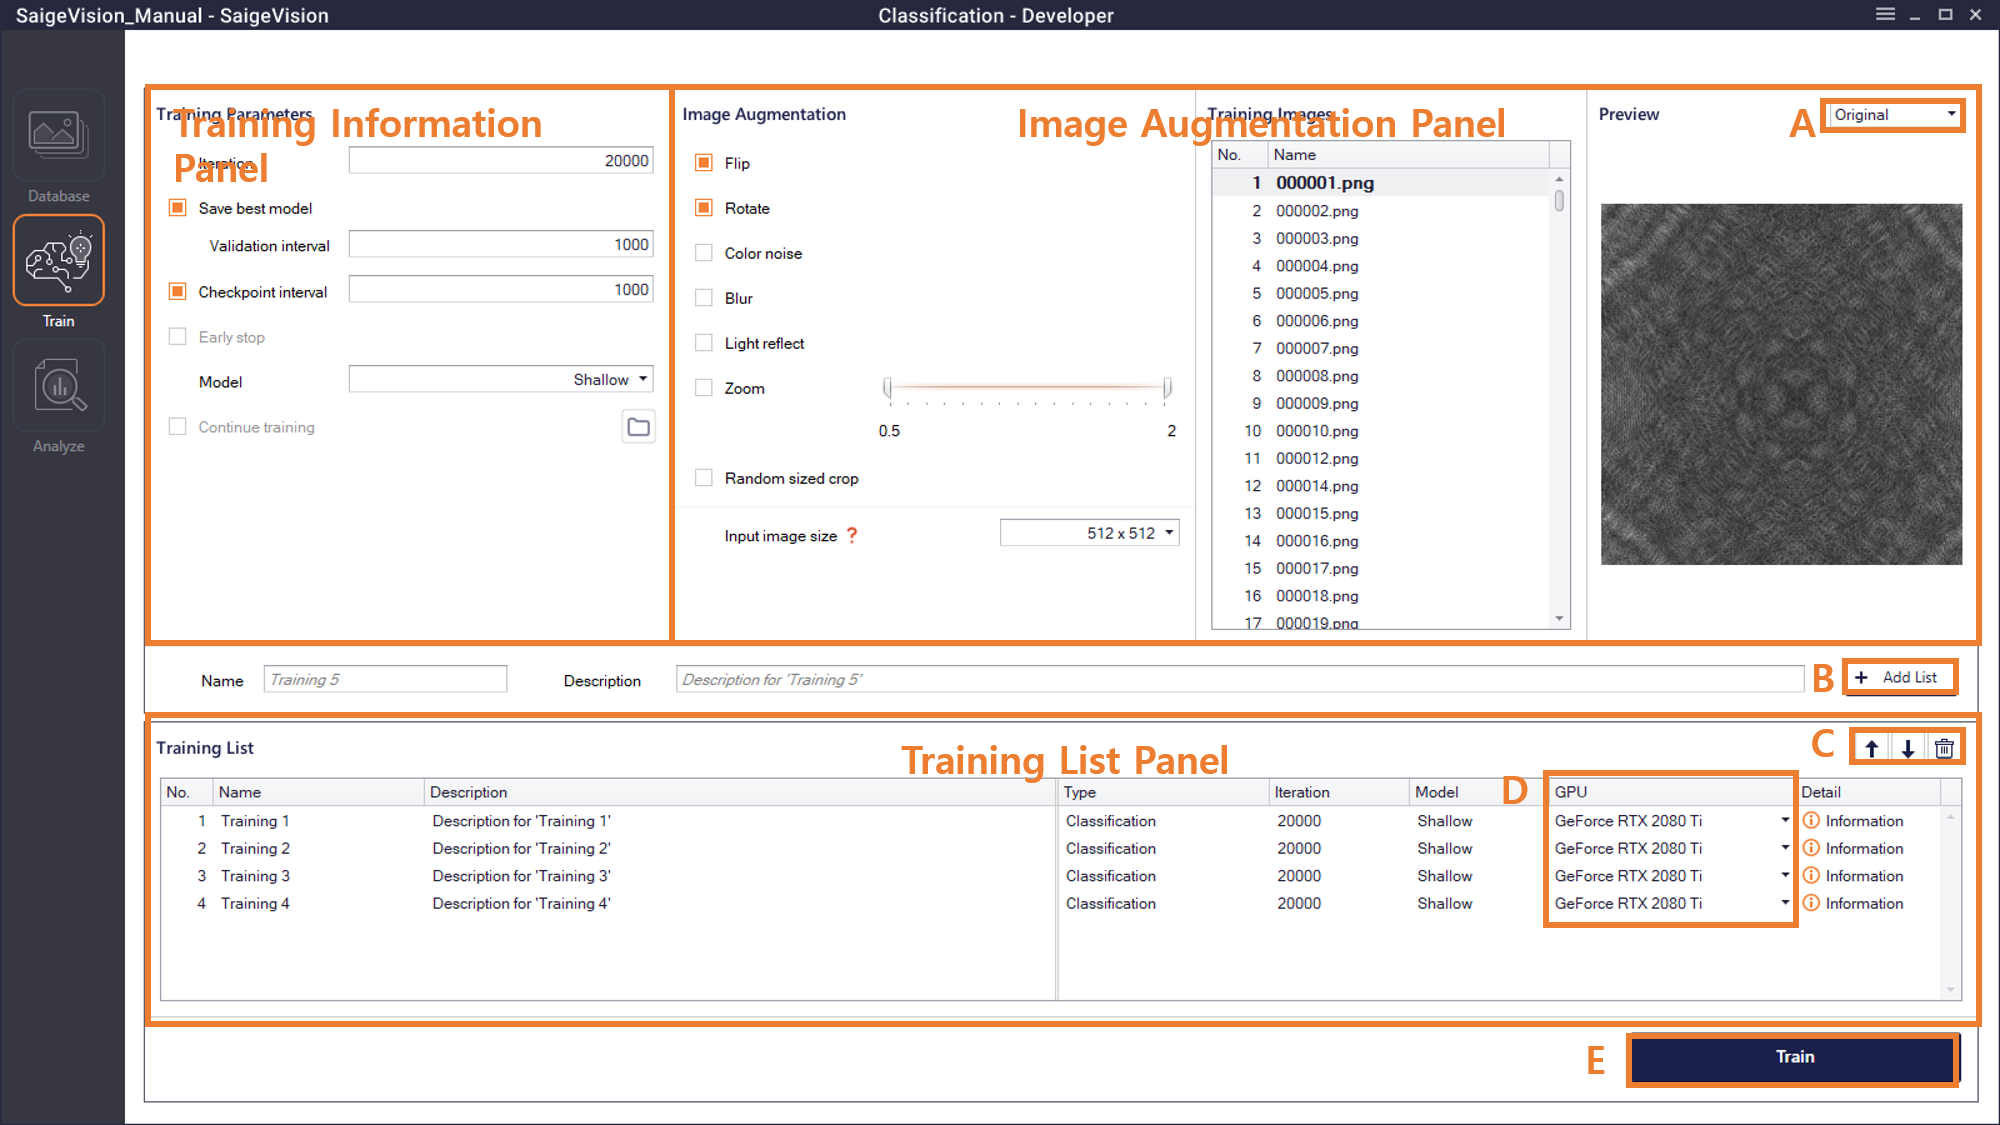
Training Information Panel (Training Parameters)
- Iteration: Training progresses by this number. It is recommended to set the value in proportion to the amount of data to be trained. Please keep in mind that at least a value of 100 must be entered to save training results.
- Save Best Model: : During training, the data belonging to the validation group is inspected and the best performance model is stored in the format of [training name].best. When the option is activated, it is possible to set the iteration interval to inspect the validation data. Validation interval should be at least 100.
- Checkpoint Interval: The training result is stored whenever training progresses by the corresponding value. If the checkbox for Checkpoint Interval is not selected, intermediate results are not saved. Here, a value of at least 500 should be entered, and if Save Best Model is activated, an integer multiple of the validation interval should be entered.
- Model: This determines the model to be used for training. Each function has three types: Shallow, Standard, and Deep. In general, when it goes from Shallow to Deep, performance tends to get better for problems with higher level of difficulty, but the inspection speed slows down. It's good to select a model that fits the characteristics of the data; however, it is more recommended to try training first with the standard, then try another model when the training results are not satisfactory.
- Continue training: This is a function that imports the previous training results and continues training. Users can import the training results by clicking the folder icon
 . The imported model name is shown in the adjacent text box. The number of training iterations of the training results imported in Continue Training is reflected in the results. For example, if users load a training result file of 5,000 iterations and continues 3,000 iterations, the result file is marked as 8,000 iterations. Users can perform Continue Training by adding new defect classes to the existing training model.
Image Augmentation Panel (Image Augmentation)
For stable and effective training, training can be performed with applying various changes to existing images. This technique is called image augmentation. Users can select the type and degree of change to be applied according to the characteristics of the image, and check how it is applied to the actual image in [Train]-[Preview].
Common (Classification, Detection, and Segmentation)
- Vertical Flip: This randomly flips the image upside down (recommended for use).
- Horizontal Flip: This randomly flips the image left and right (recommended for use).
- Rotate: This rotates the image to one of 90, 180, or 270 degrees (recommended for use).
- Color jitter: This makes subtle changes in light and shade, contrast, and color.
- Blur: This blurs the image.
- Light reflect: This has the effect of illuminating the light from random angle.
- Zoom: This generates images of various magnifications, by enlarging or reducing the image. Here, the resolution of the image does not change.
Classification
- Ratio jitter: This applies about 2% deformation to the top, bottom, left, and right ratios of the image. It is not recommended to use this when image proportions are an important factor in classification.
- Input image size: This sets the original image size to the designated size and use it for training. The smaller the input image size, the faster the training and inspection speed, but performance may deteriorate.
Detection
- Crop: This crops the image into a grid for use in training. It is recommended to use when the size of the defect is small compared to the entire image. It is generally recommended to set "Num. of rows" and "Num. of cols" so that the size of the smallest defect to detect is about 1 / 20 of the cropped grid size.
- Num. of rows: Number of rows in grid.
- Num. of cols: Number of columns in the grid.
- Input image size: : It is available in the Standard model and is identical to the feature of the Classification mode.
Segmentation
In the Segmentation mode, the patch is cropped to the Crop size from the image and resized according to the resize factor, and then entered as input to the network.
- Crop size: This crops the patch from the original image to crop size and uses it for training.
- Resize factor: This enlarges/reduces the size of the entire image or image patch by a given resize factor. (Deformed image size = Original image size x Resize factor). It is recommended to set the resize factor to a small value when the size of the entire image is too large or users want faster inspection speed.
- Input patch size: This is the size of the patch entering the deep learning network as input, which affects speed and GPU memory usage during training. Input patch size must be a multiple of 32 and at least 64. Input patch size cannot be manipulated by users, but is calculated through the following equation using Crop size and resize factor.
(Input patch size) = (Crop size) * (Resize factor) - Crop size와 resize factor의 추천 설정 조합은 다음과 같습니다.
- Recommended combination 1: Crop size = 256, resize factor = 1 (default).
- Recommended combination 2: Crop size = 512, resize factor = 1/2 (When the size of the defect to be detected is larger than the entire image).
Training List Panel (Training List)
After setting training parameters, image augmentations, name and brief description, the training item can be added to the Training List panel by clicking the [Add List] button. Users can add another training item by clicking the [Add List] button after changing the training setting, and in this way, users can train multiple trainings items sequentially. Users can change the order of the training list and delete items using the buttons in Area C. Area D shows the GPU name used for the corresponding training. If there are multiple GPUs on the computer being used, users can select the GPU to use for training by clicking the corresponding arrow in Area D. After completing the training list setting, when users click the [Train] button in Area E, the Training Progress window will appear.
Training Progress
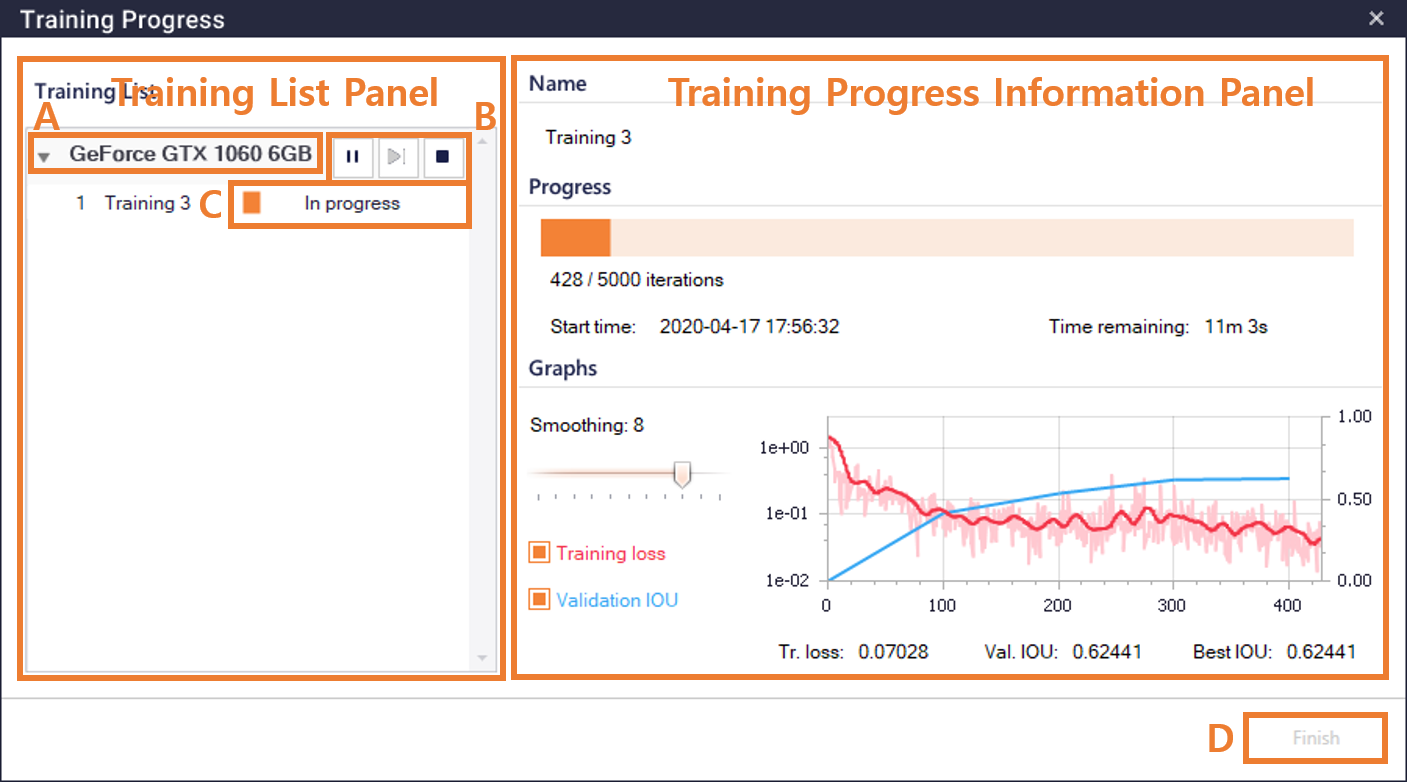
The Training Progress window provides functions to check and control the training progress of the items in the Training List panel. The GPU information set in the Training List panel is displayed in Area A, and the training lists using the same GPU are included as subitems in the area. Users can show or hide the sub-training list assigned to each GPU by clicking the arrow button in Area. Area C displays the training progress of each item, and Area B includes buttons to change the status of training progress.
| Icon | Status | Available Buttons | Changed Status |
|---|---|---|---|
 |
Before training |  |
 |
|
Training in progress |  |
 |
 ,  |
 |
||
|
Training paused | |
|
| , |
|
||
 |
Training completed | N/A | N/A |
|
Training stopped | N/A | N/A |
Caution
When
When
The Training Progress Information panel of the Training Progress window displays the name, progress, and training graph of the item selected in the Training List panel. The training graph shows two values (training loss and validation accuracy). If the value of the training loss graph is too vibrating to see the trend, users can adjust the smoothing value to view the graph with a clear shape.
Training Loss: This is a measure of how well the training data set in the [Database] is trained. Lower value indicates better performance.
Validation Accuracy: This is the result of inspecting the validation data set in the [Database]. Higher value indicates better performance.
When training of all GPUs is completed or stopped, the [Finish] button (Area D) is activated. When this button is clicked, the training progress is terminated and it moves to [Analyze] to show the training result of each item on a separate tab.
Caution
Training result is not saved when the training item is terminated before 100 iterations.