Getting Started
Install the SaigeVision Runtime C/C++ SDK to use it in your Visual Studio project or try running the example project.
Minimum and Recommended System Requirements
| Item | Minimum Requirements* | Recommended Requirements |
|---|---|---|
| OS | Windows 10 64bit or Ubuntu 20.04, 22.04 | |
| CPU | Intel Core i7 | |
| RAM | 16GB | 32GB |
| GPU | GeForce RTX 2060 6GB | GeForce RTX 3090 24GB |
* Minimum Requirements means that SaigeResearch has confirmed through its own experiments that inspections can be successfully performed in this environment. Depending on the model and data used, and other tasks running simultaneously, it may work on lower specifications or may not work on higher specifications.
Prerequisites
- SaigeVision Installer
- NVIDIA Windows Driver 471.96 (*reference)
- SaigeVision license dongle
- Windows
- (Example execution) Visual Studio 2017 or later, Windows 10 SDK
- Linux
- gcc, g++ 9.4.0 or later
- (Example build) CMake 3.28 or later
Windows
Installation File List
| Item | Location |
|---|---|
| Dynamic Library - SaigeVision.dll - SaigeVision_Impl.dll Executables - ErrorMsg.exe - Examples.exe - SaigeVisionDoctor.exe - SaigeVisionPrompt |
{Installation Path}\SaigeVision\engine\bin |
| Static Library - SaigeVision.lib |
{Installation Path}\SaigeVision\engine\lib |
| C/C++ Header - SaigeVisionAPI.h - SaigeVisionUtil.h - saige_error.h - SaigeVisionAPI_V1.h |
{Installation Path}\SaigeVision\engine\include |
| Python Environment | {Installation Path}\SaigeVision\python |
| Python Modules | {Installation Path}\SaigeVision\module |
| Configuration Files - log4cxx.xml - runtime.conf |
{Installation Path}\SaigeVision\conf |
| Examples Project | {Installation Path}\SaigeVision\engine\Examples |
| OpenCV and others | {Installation Path}\SaigeVision\engine\third_party |
Note
From version 2.8.0, third-party library folders such as OpenCV are excluded.
Executables
- ErrorMsg.exe - A command-line program that allows you to check error messages by entering error codes.
- Examples.exe - The executable file built from the example project. You can run the example program without building it yourself.
- SaigeVisionDoctor.exe - A command-line program to verify that SAIGE VISION and the Runtime SDK are properly installed.
- SaigeVisionPrompt - An engineer’s command-line processor for executing various commands in the SAIGE VISION environment.
Configuration File
- log4cxx.xml - A configuration file for logging located in the '{Installation path}\SaigeVision\engine\logs' directory.
- runtime.conf - A configuration file for connecting to the central server of SAIGE VISION Enterprise.
Using the SaigeVision Runtime C/C++ SDK in a Visual Studio Project
Visual Studio Project Configuration
To use the SaigeVision Runtime C/C++ SDK in your Visual Studio project, follow these steps, assuming that the installation process was completed successfully and the SAIGE_HOME environment variable is correctly set.
- Set the target platform to
x64. -
Copy the two DLL files,
SaigeVision.dllandSaigeVision_Impl.dll, to the application's executable path, or add the folder path containing these DLL files to the system environment variablePATH.If you're running the application only through Visual Studio, you can also set it up as follows:
Go to Project Properties and add
PATH=$(SAIGE_HOME)\SaigeVision\engine\bin;%PATH%underDebugging → Environment.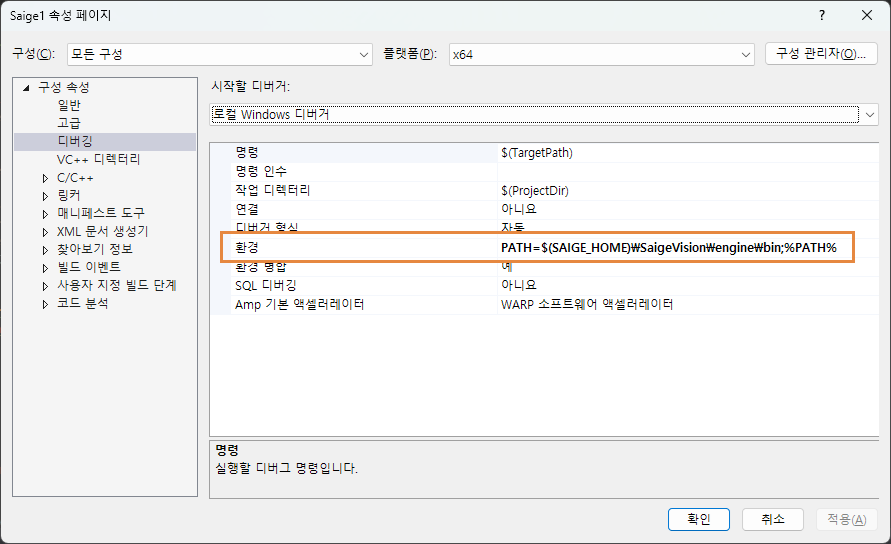
-
Under
C/C++ → General → Additional Include Directories, add$(SAIGE_HOME)\SaigeVision\engine\include.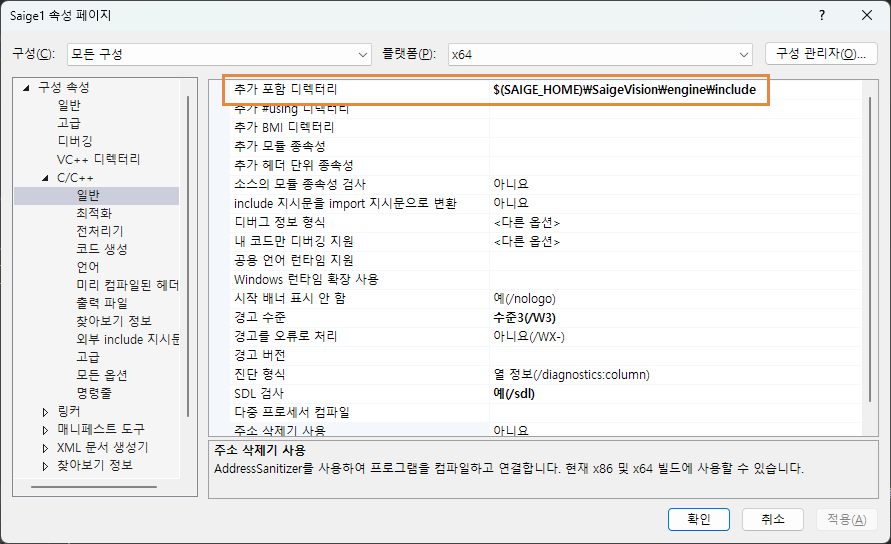
- Under
Linker → General → Additional Library Directories, add$(SAIGE_HOME)\SaigeVision\engine\lib.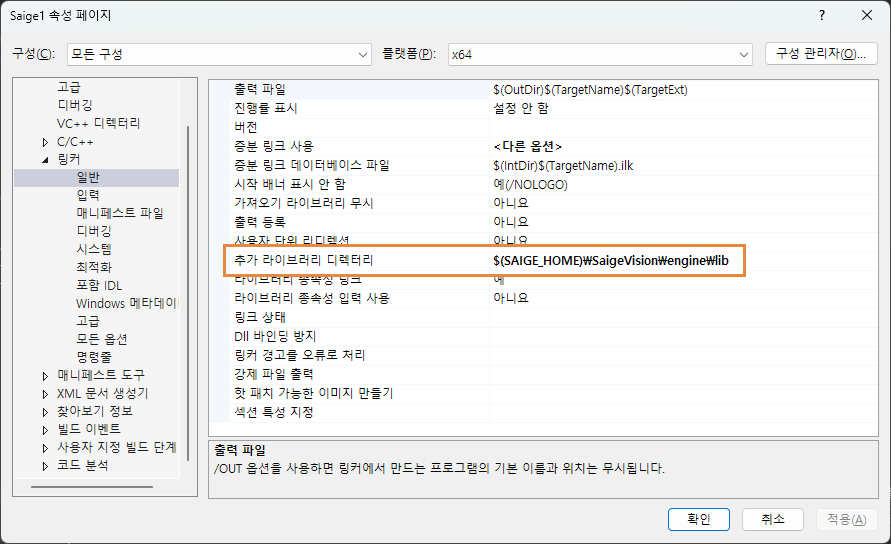
- Under
Linker → Input → Additional Dependencies, addSaigeVision.lib;.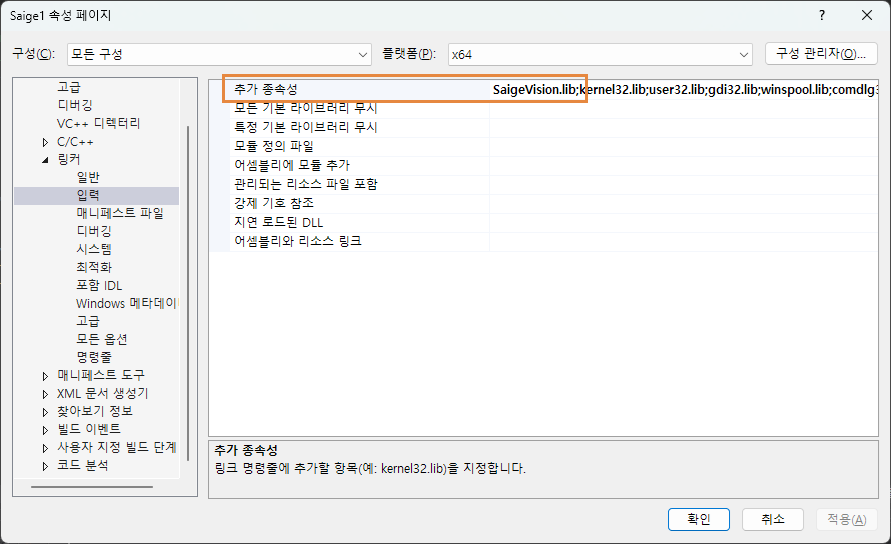
Header Files
Once the project setup is complete, you can include the SaigeVision header files to use the SaigeVision API.
-
SaigeVisionAPI.h defines the core functions, constants, structures, and flags essential for the SaigeVision inference functions. This file is required to use SaigeVision’s inference capabilities.
-
SaigeVisionUtil.h includes utility functions needed to run example code, such as handling image data and visualizing inference results. Although optional, these utility functions facilitate using SaigeVision for testing.
Building and Running Examples
All guidelines provided in the Visual Studio Project Configuration section are already applied in the example project. If you have completed the installation process successfully, you can follow the instructions below to build and run the SaigeVision example.
Build
Launch the Visual Studio project file located at {Installation Path}\SaigeVision\engine\Examples\VS2017\Examples.vcxproj.
Warning
When you open the project for the first time, Visual Studio may prompt an SDK upgrade suggestion in the Solution Review, depending on your Visual Studio version. In this case, select Do Not Upgrade.
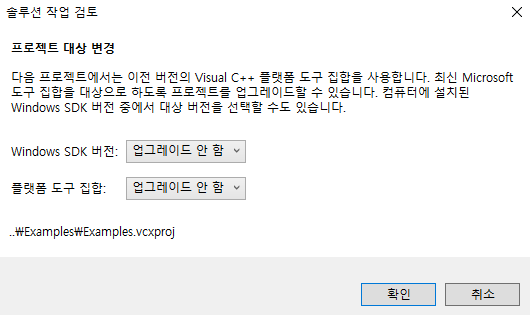
Set the build target as follows:
- Configuration: Debug or Release
- Platform: x64
Note
If the include directory cannot be found, try running Build → Clean Solution.
If the build is successful, the executable file Example.exe will be created in the path VS2017\x64\{Debug or Release}.
Running the Example
There are two ways to run the built example:
- Run the example application within Visual Studio by selecting
Start Debugging(shortcutF5) orStart Without Debugging(shortcutCtrl + F5). -
Run
Example.exethrough a terminal (cmd or PowerShell).Warning
When running in a terminal, ensure you execute from the
VS2017path to avoid relative path issues.For example, if the installation path is
C:\Saige, you should run it in the terminal as follows:PS C:\Saige\SaigeVision\engine\Examples\VS2017> .\x64\Release\Example.exe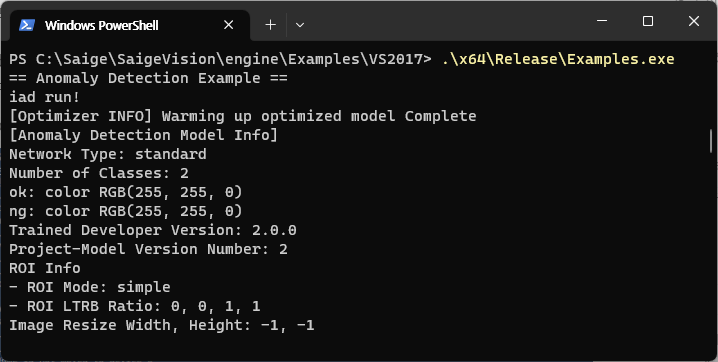
When you run the example project, you can select the desired example to perform an inference task.
Installation
Install SaigeVision using the SaigeVision Installer and refer to the provided installation guide for detailed instructions.
SAIGE_HOME Environment Variable
When running the SaigeVision Installer, you will be prompted to specify the installation path. Once installation is complete, this path will be automatically set as the environment variable SAIGE_HOME.
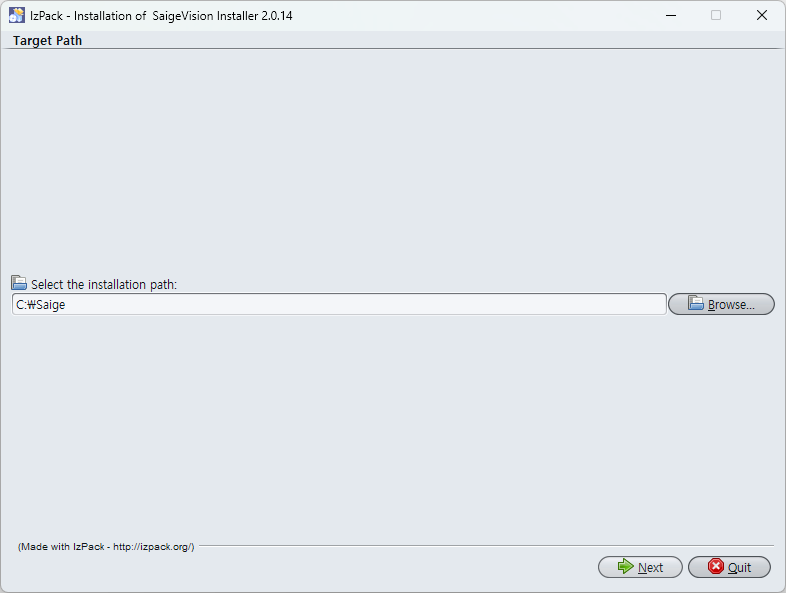
Installation Options
During the SaigeVision installation process, the Runtime SDK will always be installed, while the Developer option is optional. Depending on your needs, you may install just the Runtime SDK or both the Runtime SDK and Developer options.
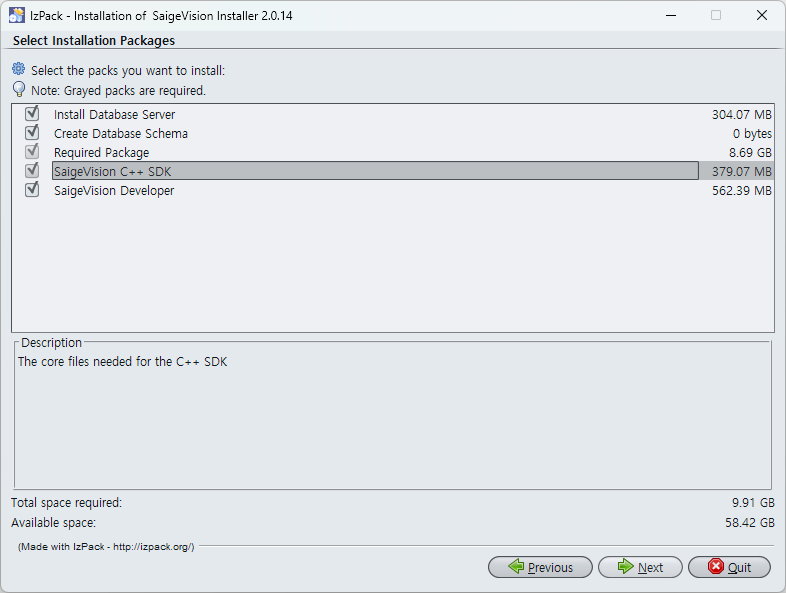
The Runtime SDK components installed via the SaigeVision Installer are listed below.
Linux
Installation
Extract the SDK archive to your desired location.
Example:
tar -xzf SaigeVision_Release_Linux_x64_2.8.0.tar.gz -C ${installation_path}
List of Installation Files
| Item | Location |
|---|---|
| Dynamic Library - libSaigeVision_Impl.so |
{installation_path}\SaigeVision\engine\bin |
| C/C++ Header - SaigeVisionAPI.h - SaigeVisionUtil.h |
{installation_path}\SaigeVision\engine\include |
| Python Environment | {installation_path}\SaigeVision\python |
| Python Modules | {installation_path}\SaigeVision\module |
| Examples Project | {installation_path}\SaigeVision\engine\Examples |
Building and Running Examples
Before running a program using the SaigeVision SDK on Linux, always execute setenv.sh.
source {installation_path}/SaigeVision/setenv.sh
Note
The environment variables set by setenv.sh are as follows:
| Environment Variable | Description |
|---|---|
| SAIGE_HOME | Path where the SaigeVision SDK is installed |
| SVSDK_LOG_CONF | Path to the default log configuration file used in Examples |
| PYTHONPATH | Location of Python modules |
| PYTHONHOME | Path to Python |
| LD_LIBRARY_PATH | Additional library path needed to run the SDK |
Build
To use the SaigeVision SDK, link the provided SDK libraries and Python libraries. For building the Examples on Linux, use the CMake build system. Here’s how to link the libraries provided by the SDK using CMake:
find_library(SAIGE_VISION libSaigeVision_Impl.so PATH $ENV{SAIGE_HOME}/SaigeVision/engine/bin)
find_library(PYTHON_LIBS libpython3.8.so PATH $ENV{SAIGE_HOME}/SaigeVision/python)
For further details, refer to SaigeVision/engine/Examples/CMakeLists.txt.
A script is provided to build the Examples directly. Run SaigeVision/engine/Examples/build.sh. This script will create a build directory in a subfolder and generate the Examples binary in that directory.
Running the Examples
To run the example, specify the desired test type (det, cls, seg, iad, ien, or ocr) as the first argument.
${SAIGE_HOME}/SaigeVision/engine/Examples/build/Examples iad
Example Code Guide
You can view all example code in the source files of the 'Examples' project. Feel free to modify the code to use the SaigeVision inference functions as desired. Each example includes basic usage instructions in comments, which you may find helpful.
In addition to 'SaigeVisionAPI.h' and 'SaigeVisionUtil.h', the example code also includes various C/C++ standard libraries. The C++ version used in the examples is C++17.
For detailed guidance on using SaigeVision inference functions, refer to the Developer Guideand API Reference.
Adjusting verbosity
Increasing the 'verbosity' variable will add more information to the console output and enable visualization of detection results.
- 0: Displays the time taken to use the inference API in milliseconds.
- 1: Outputs model information and inference options.
- 2: Outputs each image path and readable inference results.
- 3: Activates additional inference options and displays corresponding results.
- 4: Uses OpenCV to display visually interpretable inference results.
Error Handling Method
Nearly all SaigeVision APIs return an integer-type error code. A value of 0 or higher indicates success, while a negative value indicates an error.
When passing an error code to the 'SaigeStrError' function, it returns a C-string ('char*') that describes the error associated with the code.
In the example code, errors are handled differently depending on the situation. The error handling methods for each API function are as follows:
| API | Processing method |
|---|---|
SaigeCreateInferenceHandle SaigeCreateInferenceResult SaigeGetInferenceOption SaigeSetInferenceOption SaigeDestroyInferenceHandle SaigeDestroyInferenceResult |
If a handle is created, destroy it and terminate the application. |
SaigeGetInferenceResult{result_name} |
Destroy the handle and terminate the application. |
(Example) When an error occurs in SaigeSetInferenceOption
retval = SaigeSetInferenceOption(handle, &options, flags);
if (retval < 0) {
    std::cerr << "SaigeSetInferenceOption() failed - " << SaigeStrError(retval) << std::endl;
    SaigeDestroyInferenceHandle(handle);
    SaigeDestroyInferenceResult(result);
    return retval;
}
First, it outputs the location where the error occurred and the error message to stderr.
Since proceeding further becomes challenging after the inference option setup fails, the inference handle and result handle are destroyed, and the application terminates abnormally with 'return retval'.
Important Notes
- To prevent memory leaks, release the image data loaded by the utility function 'SaigeGetImageData()' using 'SaigeFreeImageData()'.
- In the example, the code for reading image paths with Korean characters is set to recognize only UTF-8 Unicode. If issues arise due to Korean paths when using 'SaigeGetImageData()', please follow these steps and rerun the example:
- Open the Settings app and go to the Time & Language menu.
- Select Language and click on Change system locale under Administrative language settings.
- Check the box for Beta: Use Unicode UTF-8 for worldwide language support and click OK.
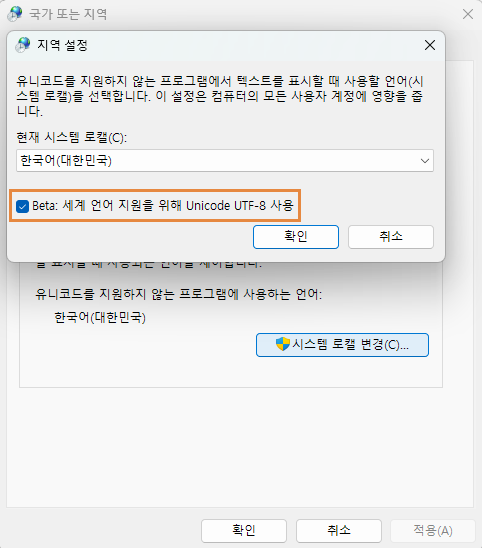
- Restart the system as prompted.
- There is limited error handling for incorrect image paths, and the program may terminate without a specific message. This issue is planned for improvement with C++17 filesystem support in future updates.
(Important) Recommended NVIDIA Driver Version and Settings
Due to potential bugs or side effects with NVIDIA graphics drivers, inference times may become abnormally long. We recommend following this guide
- NVIDIA GeForce RTX 30 Series and Below: Driver version: 471.96 link
- NVIDIA GeForce RTX 40 Series and Above: Driver version 515.15 or higher (or the latest version)
- NVIDIA Control Panel Settings
- Low Latency Mode: On
- Power Management Mode: Prefer Maximum Performance